Roofing - Walls and Wallplates

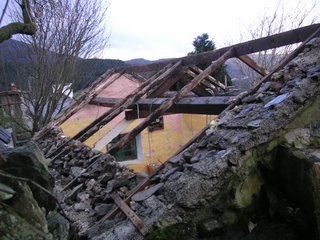
It is a tricky bit of geometry, but preserving the purlins meant resting the rafters on them: which in turn dictated the angle of the roof and the position of the rafters in relation to the wall thickness. Modern purlins are oriented so that faces are vertical and horizontal - meaning that the rafters are often notched/bird-mouthed where they pass over them. Not so in this case - they were twisted to align with the gables so the rafters sat flat on their face.
It was at this point that we realised the condition of the walls and gables were a problem. Not only were they "rotten" (i.e. the old mortar had turned to a material resembling soil and the stones were loose) but there was no provision for edge rafters or wall plates. In short, it was under designed.
The next step then was to take down the loose top 6 - 12" of wall, removing all rotten lime mortar, insect and animal deposits, treasures and goodies (nuts, leaves, dirt, carcasses, shells etc.) and rebuild.
At this point the purist might hope for a tale of lime mortar mixes - not here. as this is not a listed building the instructions from architect and Building Control Officers were clear: concrete the loose material, filling the gaps and relaying the stone and broken brick as a very coarse aggregate.

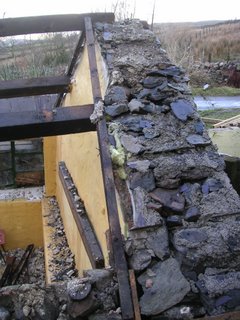
The gables were a challenge all their own - the downhill end took 15 barrows of concrete before it was satisfied. This gable faces onto a neighbour's garden and catches the full force of the prevailing south westerly winds. Our neighbour tells us that it has been in need of work for many years but has been neglected. Previous occupants have attempted repairs with concrete, as seen in the photo to the right.
Looking at the missing mortar on the exposed face, you do not have to be an engineer to see this is the case. This is also the face that was most overgrown - tree branches, honeysuckle and ivy all grew up through this face and under the ridge tiles.
We also had to bring the walls to level and clear space in order to lay the 4" x 3" wall plates. Easier said than done, but fortunately those who had gone before had an eye for this and it was relatively straightforward working with the flat fieldstone to produce the level surface we needed.
The next challenge was to fix the wall plates: drilling into stone is easy enough, but bolting can lead to cracking. Fortunately, Thunderbolts came to the rescue - 8" long, self tapping and without the need for the expansive grippers which crack stone, we were able to get a good purchase even in relatively small stones without cracking them. As belt and braces (suspenders for US readers), we elected to resin some of the tricker holes first. We also engineered some straps which we embedded in the concreted wall sections and placed over the plates, screwing them into the plates.
There is no way those plates are going to lift or spread without taking the wall with them!


0 Comments:
Post a Comment
<< Home